Странице

Apr 30, 2014

Amigurumi Keychains

Yes, I became obsessed with amigurumi :) Who wouldn't, they are so cute. Pretty little things made by your own hands, just the way you want them to look. I really can't choose what to make first. Is it going to be a toy, a cute little animal, some cartoon character, educational toy, maybe even a pillow...
I am absolutely going to make many of them. But for the beginning, I chose small ones... For keychains.


My first project was a heart, made after pattern Pepika put on her site Crochet 3D Heart. It is really easy to follow, and hearts are perfect shape and size. First one I made from some cotton yarn, but after that I wanted to see what would they look like if I made them of glitter yarn. I fell in love with them immediately. They are so pretty, I had to make one of every piece of glitter yarn I had.

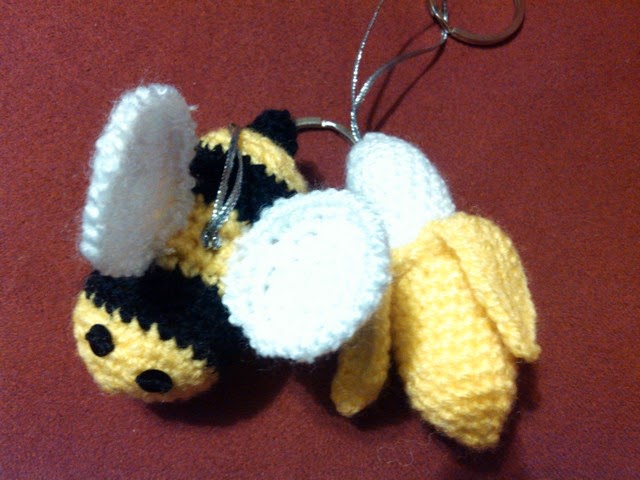
The other irresistible piece is cute little bee. I made it following this pattern: Fuzzy Little Friends. It was terrific gift for some girls, my kids' friends. They totally adored it.


Pretty little banana was made as a keychain for my son. It is very easy to make, using cotton yarn, just in two colors. 


He didn't want me to make a face of the banana-guy (or girl?) and I made it just the way he wanted. Although in the pattern I used it is very pretty with cute little mouth and eyes :) I found the pattern on Ravelry, here it is: Amigurumi Banana

I have so many patterns waiting to be tried... But it is so hard to decide what to do first. Maybe I will set some order and make them all - one by another :)


Apr 23, 2014

The Art of Amigurumi

I ran over amigurumi toys one day while I was looking for something totally different... But when I saw them, I totally fell in love. It is amazing that so fantastic little things can be made of yarn, just using one simple stitch over and over... So many original toys, animals, dolls, educational staff... I am not so experienced in making amigurumi to create my own, but for now I am fascinated with pieces that I made using patterns available online.
There are so many incredible patterns to use, it is so hard to choose one. So, I left the choice to my sons. They love those things I make, unbelievable for boys. Well, this time they chose a character from their favorite animated series, Family Guy - little Stewie Griffin.

I found several patterns online, and chose one of them. Thanks to Erin, I used her pattern: Stewie Griffin A Crochet Pattern by Erin Scull. And I am very happy to say that my Stewie came out just the same as in the TV series.


My son adores his new little friend. They study together, Stewie has his own place among my son's books. I wonder if he learnt something :) He has his own place in my son's bed, his own blanket. When my son leaves the apartment, Stewie is waiting for me on the coffee table, holding a note that my son left to me. I wonder if I should get him some small plates, maybe he should eat with us on the kitchen table?
The next one I plan to make is Brian, and maybe someone else from the Family Guy. We'll see.

Apr 18, 2014

Decoupage Easter Eggs

Every year I choose some new technique to dye Easter eggs. There were eggs dyed in food colour, naturally coloured in onion peels, spinach or red cabbage, drawn with wax and melted crayons... Or just dyed and decorated with some stickers.
 
This year I wanted to make some decoupage eggs. I could find many pretty napkins with Easter ornaments, flowers and other pretty little pictures. That's easy, but I wanted some graphic ornaments to make some unique eggs. No, there aren't napkins with such ornaments. I just found them browsing pictures on the net and decided to print them. And make my own unique decoupage napkins.
To do that, I needed the usual printing paper and double-layered paper towels. One piece of paper towel I just glued with the paper glue to the printing paper. This paper I used to print the ornament I chose. It looked like this:
 
 
When the ornament is printed, I could peel off the first, printed layer of the paper towel. This thin piece of printed paper I used for my decoupaged eggs. I tried to do this on dyed eggs (in light red colour) and on natural eggs. Both of them seems amazing to me.
Decoupage for Easter eggs is not made in usual way for decoupage, for this has to be edible. We use an egg white as a natural glue. Just scramble it with the fork and spread it on the egg with the small brush. Now you can put the picture on the egg. Just wrap it around and cut the parts you don't need and overlapping parts. Gently press it on the egg with a kitchen sponge and let it dry.
Here are my decoupaged eggs, I am absolutely going to make some more, I enjoyed decorating them :)


Apr 15, 2014

Crochet Cell Phone Cover

I don't like industrial products. If I can create and make something by myself, I do it. And that is... Well, almost everything. Cute little things are special challenge for me, because they are made so quickly. Just for the time someone needs to go to the shop and find the thing he likes, I am going to make the same thing for myself, unique and with personal note.

Cell phone cover is so easy to make. You just need to choose the technique you are going to use. For me, it always depends on materials I have on hand that particular moment. Today the first thing I saw when I opened my craft-closet was glittering yarn. So, my new cover is going to be made of it.


Crocheting a cell phone cover is in the category Easy to make. The whole process is really simple. You just need yarn - as many colors you like, and an adequate crochet hook. I used glittering yarn and a hook No 2.5.

To start your work, you just need to crochet a simple chain as long as your phone is wide.
Now you star from the third loop from the hook, with a single crochet.
Work all around  (both sides of the chain) with single crochet.
Go to work along all in single crochet just untill your work is high enough for your phone.
Next round you start with ch2, then double crochet all around.
Finish this round with slipstich in the top of the first double chain.
The last round you will work all in slipstich. Finish your work.
You can pull some nice ribbon zig-zag through the last round (worked in double chain) and add some interesting pearl to the end of the ribbon.

That's it. Simple, but just the one you made by yourself. Those are some of the covers I made earlier:


Apr 10, 2014

Six-hands Cheese Crescents

Two kids and me in the kitchen... The plan is to make something for breakfast, I hope it is going to be edible :)

What are the benefits of making food with kids? Flour everywhere over the kitchen, white faces and hands not visible under the dough, some undefined forms of dough spread all over the kitchen table... And it won't be over very fast, they enjoy the game :)
But this game can always be educational. You can turn it into math class, learn colors, fact about some groceries...

This was our game (children of 3 and 6):

- How many eggs do we have in the box?
- When we use 2 eggs, how many remain?

- Where does this milk come from?
- What animal gives us the milk?

- How do we get flour?
- Where does it come from?

- What is the egg consisted of?
- What color is which part of an egg?

- What shape is this?
- Can you make a triangle?

And so on, and so on... Depending on groceries you use to make what you intend to.
Today we made cheese crescents. Very quick and easy to make. Children can make them, too. They are so sweet with their little tools (stolen from play-dough) and enormously large aprons, that goes all to their toes. But it is useful, when you think of all the spilled flour...


That's what we needed for our crescents:

For dough:
- 2 cups of white flour
- 4 oz cottage cheese
- 1/4 cup milk
- 1/4 cup oil
- 1 egg white
- 3 tsp backing soda
- 1 Tsp salt

For spread:
- 1 egg yolk
- 1 Tsp milk
- sprinkle of salt
- sprinkle of pepper

I poured everything we needed into the cups, kids poured it into the bowl. Counting all the time. Then we mixed everything thoroughly - kids for the beginning, then I finished the dough. I divided it into three equal parts and spread two of them into the rounds. Then we used knives from play-dough to cut them into eights (elder child did it perfectly). I made the first crescent to show kids how to roll them, and with a little help they finished the rest of the rolls. The third part of the dough was left for freeform shaping. It came into some weird forms, pretended to be crescents... Small tiny crescents, more like fingers, but very cute. The prettiest, absolutely. Made by sweet little hands.

Final step was to coat them with spread and they were ready to get into oven, for about 30 minutes.


At last we could sit and wait for our breakfast. It was so yummy!

Made by pretty little hands. The best breakfast ever.

I send hundreds of kisses to my dear friend who gave me this recipe, it is really fantastic. We had a great time, and a great meal.

Apr 7, 2014

Sring Spirit All Over Me

Sunny days, cozy evenings... Ideal for long pleasant walks along the nearby riverside. This is the perfect time to increase our physical activity and wake up from winter laziness. I choose power walking - it increases my heart rate, makes me feel better and I climb the stairs without noticing it... Don't have to take a half an hour pause to get breathing to normal anymore.


I enjoy my power walks very much, regardless I sweat so much. When I come home wet from head to toes, the nice shower waits for me. That's another place where I brought spring spirit. I am going to have a total remedy of myself.
I start from my hair. Washing it every day after walking and sweating makes it dry and tired-looking. Store bought conditioners and masks never gave me expected effects. So, now I use only natural ingredients to put onto my hair. Instead of any industrial hair mask, I cover my hair with olive oil and spread it over well with my comb. Now hair goes under the plastic cap and wrap with the hot towel, that increases effect of oil. After half an hour (or more, if you like) hair can be washed the usual way. It will be shiny, silky and amazingly moisturized.


Next stop is my body. After constant use of soaps that dry a skin, it needs a good scrubbing. The best of all scrubs is made also in my kitchen. I mix equal parts of sugar, coffee grounds and olive oil. This mix I add to my skin and gently scrub whole body, then wash in usual way. Skin is soft and silky, and doesn't need any body cream at all, as olive oil moisturizes it just enough.


Then I get out of the shower and skip to my face. The same scrub can be used on face, too. After washing it gently using mild soap, I don't wipe it with towel, but on the wet skin put some olive oil with my hands, gently massaging it. If skin is too oily after that, it just needs to be slightly washed with lukewarm water and without using a towel left to dry itself. This is the best way to moisturize your skin.
Whole body remedy using supplies from my kitchen. Nature all over me.

Now I am ready to have my special spring meal, with plenty of green vegetables... Afterwards, instead of coffee I used to make before diving into my favorite book, now I make energy juice mix. All made by myself, following mom's recipe. It recovered me after many child sickness periods, so it does now.
I just love spring, it makes me so fresh and new.


Apr 5, 2014

Spring Came Into my Kitchen

Ok, winter's finally over. No more clouds, no more wind, snow, rain and fogs. Sunny days are waking up the nature. Sun is peeking through the windows into my home. And showing me everything that I have to do - immediately!

Well, I started with gathering supplies for all-day-long action.
- Microfiber cloth, several of them
- Abrasive sponge, for persistent stains
- Paper towels
- Baking soda
- My magic cleaner


You wonder what is Magic cleaner? That is my homemade cleaner made of natural ingredients, found in my kitchen, non toxic and safe for my hands. And the most important, it cleans really magically, just as not any chemical, store bought cleaner does. To make it I need:
- one spray bottle
- 1 Tsp white vinegar
- 1 Tsp dish washing liquid
- water to fill the rest of the bottle


There is no stain in the kitchen that can resist this cleaner. Just spray it on the surface, wait for several minutes and clean with microfiber cloth. That's all. Your kitchen is going to shine. I use it for kitchen appliances, tiles, cabinet doors. I also use it for microwave and for the oven. If your oven needs a tougher cleaning, you just sprinkle it with baking soda and spray the cleaner over it, then leave it for half an hour. After that, you may need to use an abrasive sponge to clean it thoroughly and wipe with paper towels. Now you can wipe your oven with clean  microfiber cloth, and if needed spray some more times with cleaner just to clean it perfectly.

When I used this cleaner for the first time, I really didn't believe that it is so efficient. But it is really amazing. No more rubber gloves, no more tough scratching, poisoning smell of chemical cleaners, pain in my hands... Now I clean the kitchen and don't get tired at all. It is just unbelievable.

The same spray I am going to make for next week, when I plan to clean my windows. Just add some rubbing alcohol into the mix, and my windows are going to shine on the spring sun.
Now I enjoy spring cleaning - never believed that this is going to happen some day!